本文已参与「开源摘星计划」,欢迎正在阅读的你加入。活动链接:https://github.com/weopenprojects/WeOpen-Star
方案的选择
#
分析了
官方 Github: Harbor 高可用方案讨论, 一开始我们选择了 Solution 1 (双激活共享存储方案), 在公司内部大概运行了一年多的时间, 架构图如下:
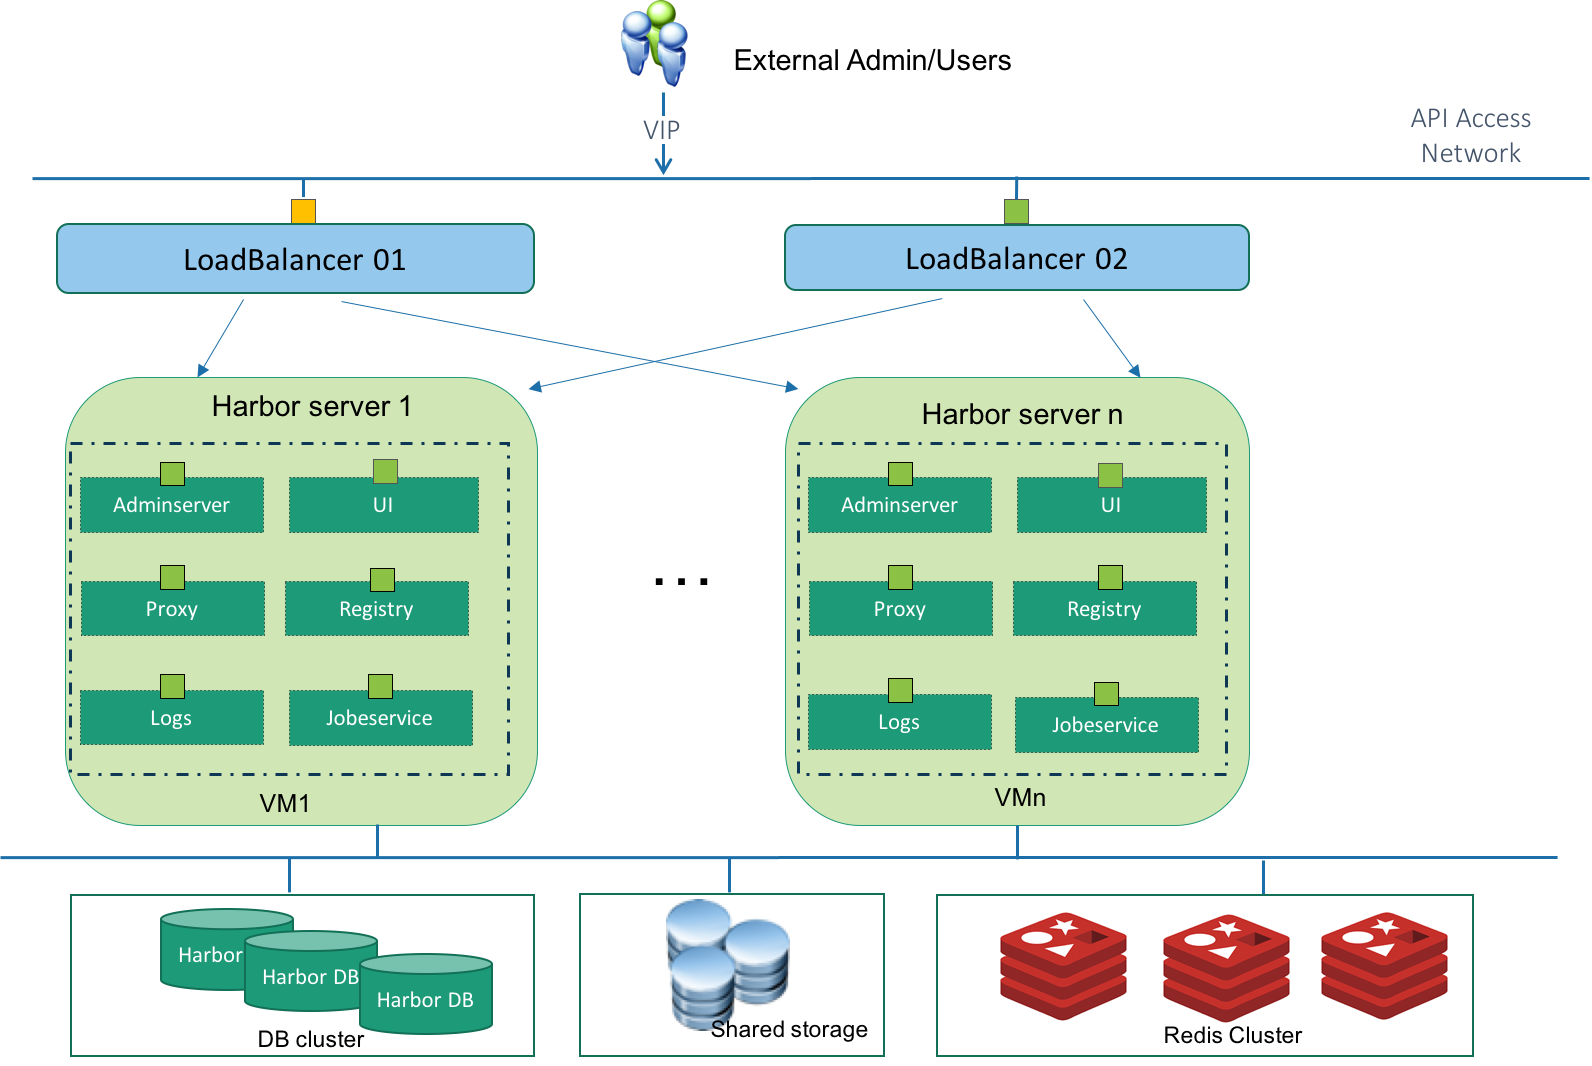
从图中可以看到, 这种方案基于外部共享存储、外部数据库和 Redis 服务, 构建其两个/以上的 harbor 实例. 既然使用了外部的服务, 那么高可用的压力自然而然的转移到了外部服务上. 我们一开始采用的外部的 NFS 共享存储服务, 由于我们团队实际情况, 我们暂时还不能保证外部存储的高可用. 同时, 鉴于我们对镜像服务高可用的迫切需求, 决定调研新的 Harbor 的高可用方案.
选择了 Solution 4 (双主复制方案), 这个解决方案, 使用复制来实现高可用, 它不需要共享存储、外部数据库服务、外部 Redis 服务. 这种方案可以有效的解决镜像服务的单点故障. 架构图如下:
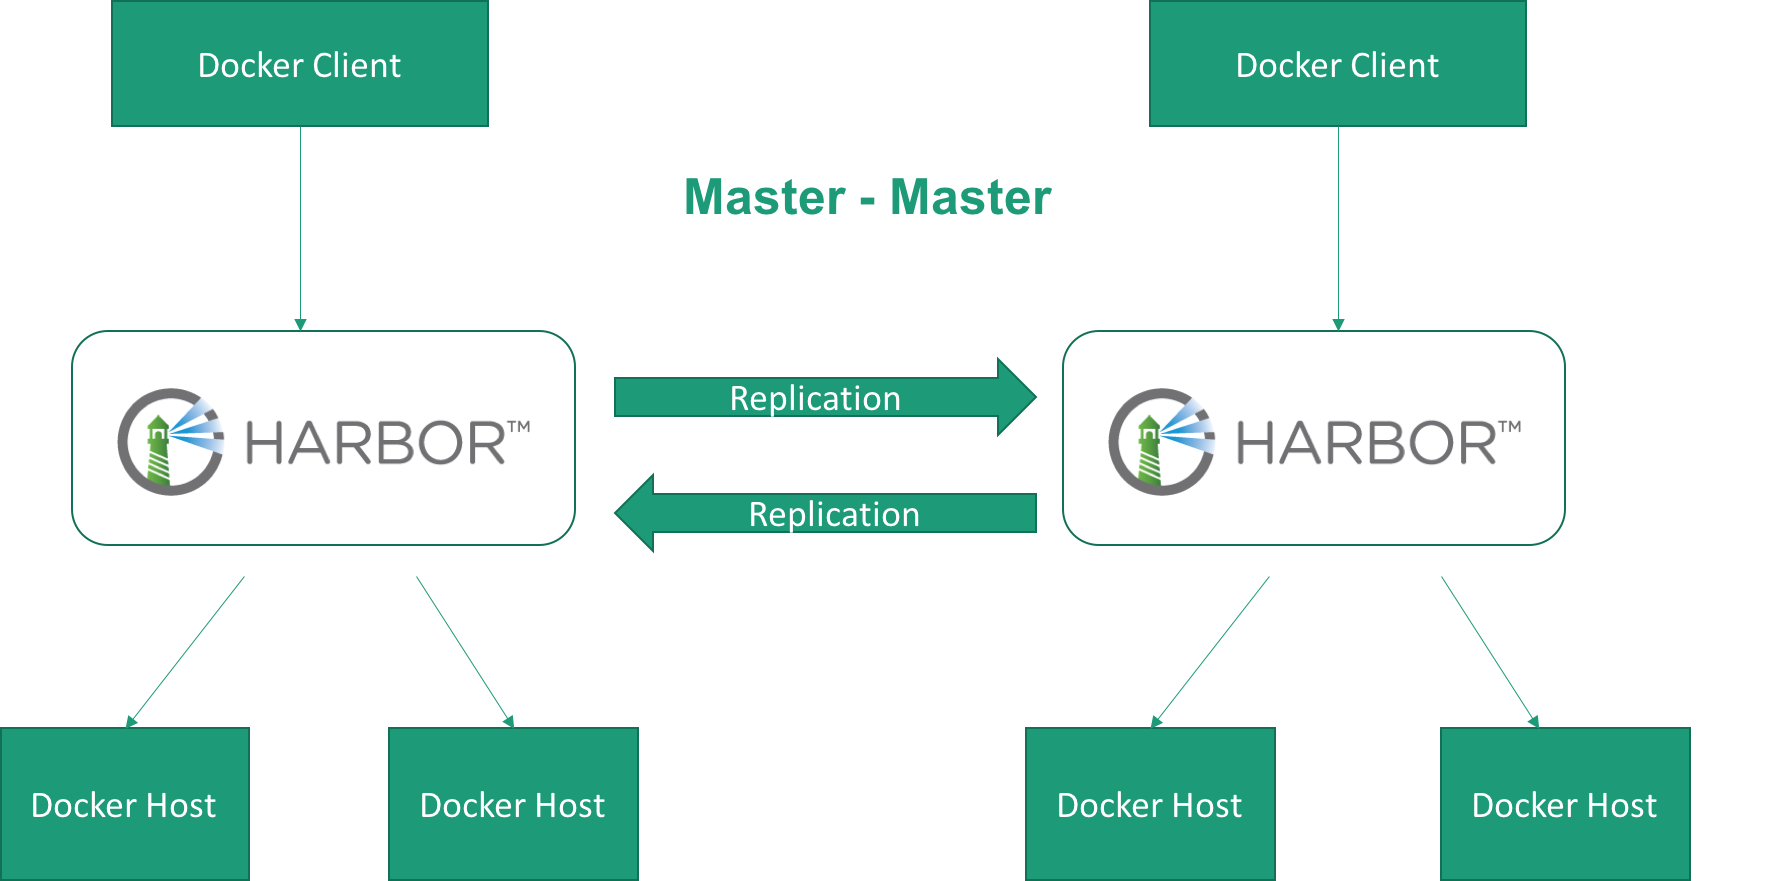
从图中可以看到, 这种方案仅需要在两个 harbor 实例之间建立全量复制机制. 这种方案特别适合异地办公的团队.
环境
#
以下是服务器和各组件的详细情况:
| 服务器配置 | 值 |
|---|
| 虚拟机 | 2台 |
| IP/内网 | 10.206.99.57, 10.206.99.58 |
| 配置 | 4核8G, 系统盘160G, 数据盘5T挂载到/data目录 |
| 操作系统 | CentOS 7.9 |
| 用户 | root |
这里把数据磁盘挂到 /data 目录, 是因为 harbor 的数据卷配置默认就是它, 后面就不需要修改 harbor 这块的配置了.
| 组件 | 配置/版本 | 说明 |
|---|
| docker-ce | 20.10.14 | |
| docker-compose | 1.29.2 | 最新稳定版 |
| harbor | v2.2.4 | 离线版 |
安装 docker
#
参考
Install Docker Engine on CentOS 来安装, 因为我是全新的系统, 直接安装:
安装 yum 仓库
#
安装 yum-utils 包, 它能提供 yum-config-manager 配置工具, 然后用工具来配置安装稳定的 yum 仓库.
1
2
3
4
| yum install -y yum-utils
yum-config-manager \
--add-repo \
http://mirrors.aliyun.com/docker-ce/linux/centos/docker-ce.repo
|
这里使用阿里云镜像替换
https://download.docker.com/linux/centos/docker-ce.repo
安装 docker 引擎
#
安装最新稳定版 Docker 引擎和 containerd
1
| yum install -y docker-ce docker-ce-cli containerd.io
|
启动 docker 实例并配置开机自动启动
1
2
| systemctl start docker
systemctl enable docker
|
优化 docker 配置
#
做一些 docker 相关的配置优化:
 1
 2
 3
 4
 5
 6
 7
 8
 9
10
11
12
13
| cat <<EOF | tee /etc/docker/daemon.json
{
"exec-opts": ["native.cgroupdriver=systemd"],
"log-driver": "json-file",
"log-opts": {
"max-size": "100m"
},
"storage-driver": "overlay2",
"storage-opts": [
"overlay2.override_kernel_check=true"
]
}
EOF
|
重启启动 docker 实例
1
2
| systemctl daemon-reload
systemctl restart docker
|
安装 docker-compose
#
harbor 使用 docker-compose 进行部署, 当前最新稳定版本是 1.29.2, 使用下面命令进行安装:
1
2
3
4
| curl -L "https://github.com/docker/compose/releases/download/1.29.2/docker-compose-$(uname -s)-$(uname -m)" -o /usr/local/bin/docker-compose
# 如果你的服务器也是 Linux-x86_64, 可以用这个国内的地址下载
curl -L "https://rutron.oss-cn-beijing.aliyuncs.com/tools/docker-compose-Linux-x86_64" -o /usr/local/bin/docker-compose
chmod +x /usr/local/bin/docker-compose
|
安装 Harbor 实例
#
打开
Harbor 下载页面, 下载离线安装器. 因为之前使用的是 v2.2.0 版本, 有不少应用已经对接了 harbor 的 api, 为了兼容性, 我选择了 v2.2.4.
1
2
3
4
5
| # 使用 root 用户 ~ 目录
cd /root
curl -O https://rutron.oss-cn-beijing.aliyuncs.com/harbor/harbor-offline-installer-v2.2.4.tgz
tar xzvf harbor-offline-installer-v2.2.4.tgz
cd harbor
|
由于 github-releases 下载页面速度很慢, 我将下载好的包放在了 aliyun-oss 上
配置文件
#
拷贝示例配置文件, 进行修改:
1
2
| cp harbor.yml.tmpl harbor.yml
vi harbor.yml
|
因为我打算采用默认安装, 所以需要修改的配置项不多, 仅有几个地方需要修改:
- hostname: 访问 harbor admin ui 和镜像服务的 hostname 或者 ip
- https:
- certificate: 线上服务基本都需要要开通 https, 为 https 配置证书路径
- private_key: 为 https 配置私钥路径
- external_url: 如果要把 harbor 放在代理的后面, 比如请求会通过 nginx/f5 的代理转发才会到 harbor, 就需要配置该项. 如配置了该项, 上面的
hostname 配置就会失效. - database.paasword: 数据库密码, 线上环境必须修改
- data_volume: 这是 harbor 的数据目录, 默认是
/data, 因为我服务器的数据盘就挂的 /data 目录, 这里就不需要修改了.
下面是默认配置文件, 重点配置我都做了翻译。别看配置文件这么长,重要的都在前 50 行:
  1
  2
  3
  4
  5
  6
  7
  8
  9
 10
 11
 12
 13
 14
 15
 16
 17
 18
 19
 20
 21
 22
 23
 24
 25
 26
 27
 28
 29
 30
 31
 32
 33
 34
 35
 36
 37
 38
 39
 40
 41
 42
 43
 44
 45
 46
 47
 48
 49
 50
 51
 52
 53
 54
 55
 56
 57
 58
 59
 60
 61
 62
 63
 64
 65
 66
 67
 68
 69
 70
 71
 72
 73
 74
 75
 76
 77
 78
 79
 80
 81
 82
 83
 84
 85
 86
 87
 88
 89
 90
 91
 92
 93
 94
 95
 96
 97
 98
 99
100
101
102
103
104
105
106
107
108
109
110
111
112
113
114
115
116
117
118
119
120
121
122
123
124
125
126
127
128
129
130
131
132
133
134
135
136
137
138
139
140
141
142
143
144
145
146
147
148
149
150
151
152
153
154
155
156
157
158
159
160
161
162
163
164
165
166
167
168
169
170
171
172
173
174
175
176
177
178
179
180
181
182
183
184
185
186
187
188
189
190
191
192
193
194
195
196
197
198
199
200
201
202
203
204
205
206
| # Harbor 配置文件
# 访问管理端 UI 和容器镜像服务使用的 IP 地址或者 hostname
# 禁止使用 localhost 或 127.0.0.1, 因为 Harbor 需要被外部客户端访问
hostname: reg.mydomain.com
# http related config
http:
# port for http, default is 80. If https enabled, this port will redirect to https port
port: 80
# https 相关配置
https:
# harbor https 端口, 默认 443
port: 443
# nginx 证书和私钥路径
certificate: /your/certificate/path
private_key: /your/private/key/path
# # Uncomment following will enable tls communication between all harbor components
# internal_tls:
# # set enabled to true means internal tls is enabled
# enabled: true
# # put your cert and key files on dir
# dir: /etc/harbor/tls/internal
# 取消注释会开启外部代理
# 如开启了该配置, 就不会使用 hostname 了
# external_url: https://reg.mydomain.com:8433
# Harbor 管理后台初始密码
# 仅第一次安装 harbor 时有用
# 登录 harbor 管理后台之后, 记得修改 admin 密码
harbor_admin_password: Harbor12345
# Harbor 数据库配置
database:
# Harbor 数据库 root 用户的密码
# 上生产环境, 必须要修改
password: root123
# 空闲连接池中的最大连接数量
# 如果 <=0 表示不保留任何空闲连接
max_idle_conns: 50
# 数据库开启的最大连接数
# 如果 <=0, 表示不限制打开连接数
# 注意: harbor 使用的 postgres 该配置默认是 1024
max_open_conns: 1000
# 默认数据卷
data_volume: /data
# Harbor Storage settings by default is using /data dir on local filesystem
# Uncomment storage_service setting If you want to using external storage
# storage_service:
# # ca_bundle is the path to the custom root ca certificate, which will be injected into the truststore
# # of registry's and chart repository's containers. This is usually needed when the user hosts a internal storage with self signed certificate.
# ca_bundle:
# # storage backend, default is filesystem, options include filesystem, azure, gcs, s3, swift and oss
# # for more info about this configuration please refer https://docs.docker.com/registry/configuration/
# filesystem:
# maxthreads: 100
# # set disable to true when you want to disable registry redirect
# redirect:
# disabled: false
# Trivy configuration
#
# Trivy DB contains vulnerability information from NVD, Red Hat, and many other upstream vulnerability databases.
# It is downloaded by Trivy from the GitHub release page https://github.com/aquasecurity/trivy-db/releases and cached
# in the local file system. In addition, the database contains the update timestamp so Trivy can detect whether it
# should download a newer version from the Internet or use the cached one. Currently, the database is updated every
# 12 hours and published as a new release to GitHub.
trivy:
# ignoreUnfixed The flag to display only fixed vulnerabilities
ignore_unfixed: false
# skipUpdate The flag to enable or disable Trivy DB downloads from GitHub
#
# You might want to enable this flag in test or CI/CD environments to avoid GitHub rate limiting issues.
# If the flag is enabled you have to download the `trivy-offline.tar.gz` archive manually, extract `trivy.db` and
# `metadata.json` files and mount them in the `/home/scanner/.cache/trivy/db` path.
skip_update: false
#
# insecure The flag to skip verifying registry certificate
insecure: false
# github_token The GitHub access token to download Trivy DB
#
# Anonymous downloads from GitHub are subject to the limit of 60 requests per hour. Normally such rate limit is enough
# for production operations. If, for any reason, it's not enough, you could increase the rate limit to 5000
# requests per hour by specifying the GitHub access token. For more details on GitHub rate limiting please consult
# https://developer.github.com/v3/#rate-limiting
#
# You can create a GitHub token by following the instructions in
# https://help.github.com/en/github/authenticating-to-github/creating-a-personal-access-token-for-the-command-line
#
# github_token: xxx
jobservice:
# Maximum number of job workers in job service
max_job_workers: 10
notification:
# Maximum retry count for webhook job
webhook_job_max_retry: 10
chart:
# Change the value of absolute_url to enabled can enable absolute url in chart
absolute_url: disabled
# 日志配置
log:
# 可选项 debug, info, warning, error, fatal
level: info
# 使用 local 存储的日志相关配置
local:
# 日志轮转文件数量
# 日志文件在被删除之前会轮转 rotate_count 次
# 如果 0 则删除旧版本而不是轮换。
rotate_count: 50
# 当日志文件大于 rotate_size 个字节 bytes 时会轮换
# 如果 size 后跟 k 则表示以 kb 为单位, 也可以跟 M/G
# 所以 100/100k/100M/200G 都是合法的
rotate_size: 200M
# 存储日志的主机目录
location: /var/log/harbor
# Uncomment following lines to enable external syslog endpoint.
# external_endpoint:
# # protocol used to transmit log to external endpoint, options is tcp or udp
# protocol: tcp
# # The host of external endpoint
# host: localhost
# # Port of external endpoint
# port: 5140
#This attribute is for migrator to detect the version of the .cfg file, DO NOT MODIFY!
_version: 2.2.0
# Uncomment external_database if using external database.
# external_database:
# harbor:
# host: harbor_db_host
# port: harbor_db_port
# db_name: harbor_db_name
# username: harbor_db_username
# password: harbor_db_password
# ssl_mode: disable
# max_idle_conns: 2
# max_open_conns: 0
# notary_signer:
# host: notary_signer_db_host
# port: notary_signer_db_port
# db_name: notary_signer_db_name
# username: notary_signer_db_username
# password: notary_signer_db_password
# ssl_mode: disable
# notary_server:
# host: notary_server_db_host
# port: notary_server_db_port
# db_name: notary_server_db_name
# username: notary_server_db_username
# password: notary_server_db_password
# ssl_mode: disable
# Uncomment external_redis if using external Redis server
# external_redis:
# # support redis, redis+sentinel
# # host for redis: <host_redis>:<port_redis>
# # host for redis+sentinel:
# # <host_sentinel1>:<port_sentinel1>,<host_sentinel2>:<port_sentinel2>,<host_sentinel3>:<port_sentinel3>
# host: redis:6379
# password:
# # sentinel_master_set must be set to support redis+sentinel
# #sentinel_master_set:
# # db_index 0 is for core, it's unchangeable
# registry_db_index: 1
# jobservice_db_index: 2
# chartmuseum_db_index: 3
# trivy_db_index: 5
# idle_timeout_seconds: 30
# Uncomment uaa for trusting the certificate of uaa instance that is hosted via self-signed cert.
# uaa:
# ca_file: /path/to/ca
# Global proxy
# Config http proxy for components, e.g. http://my.proxy.com:3128
# Components doesn't need to connect to each others via http proxy.
# Remove component from `components` array if want disable proxy
# for it. If you want use proxy for replication, MUST enable proxy
# for core and jobservice, and set `http_proxy` and `https_proxy`.
# Add domain to the `no_proxy` field, when you want disable proxy
# for some special registry.
proxy:
http_proxy:
https_proxy:
no_proxy:
components:
- core
- jobservice
- trivy
# metric:
# enabled: false
# port: 9090
# path: /metrics
|
默认安装
#
默认安装不含 Notary, Trivy, 或者 Chart 仓库服务, 执行下面的命令:
查看安装状态:
如果所有的容器的状态 STATUS 都为 Up About a minute (healthy) 说明安装成功~
打开 harbor admin ui 验证下吧! 别忘了修改 admin 的密码. 使用同样的方式将两台虚拟机的 docker、docker-compose 和 harbor 都安装好.
更改配置
#
如果需要更改 harbor 的配置, 请按照如下步骤操作:
- 停止 harbor
1
2
3
| # 首先进入工作目录
cd ~/harbor/
docker-compose down -v
|
- 更新配置文件
- 运行脚本生成最终配置
- 重新启动 harbor 实例
- 其他命令
1
2
3
4
| # 重装前清理历史数据
rm -rf /data/database
rm -rf /data/registry
rm -rf /data/redis
|
配置双主复制
#
在其中一台 harbor 实例上配置,我以 10.206.99.58 为例,另一实例同理,首先需要创建仓库,点击系统管理>仓库管理>新建目标,按照如下填写:
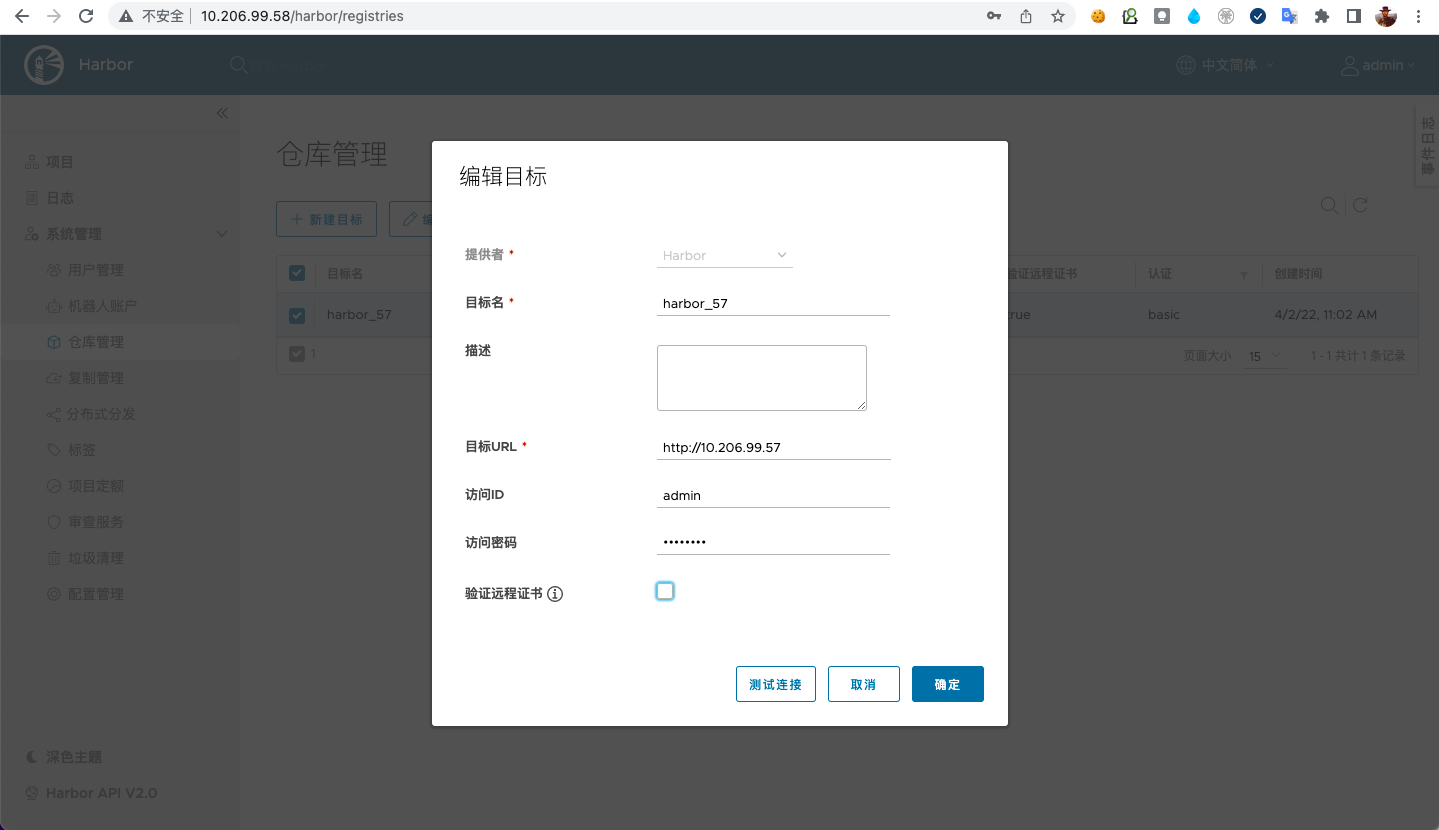
然后,创建复制规则,点击系统管理>复制管理>新建规则,按照如下填写:
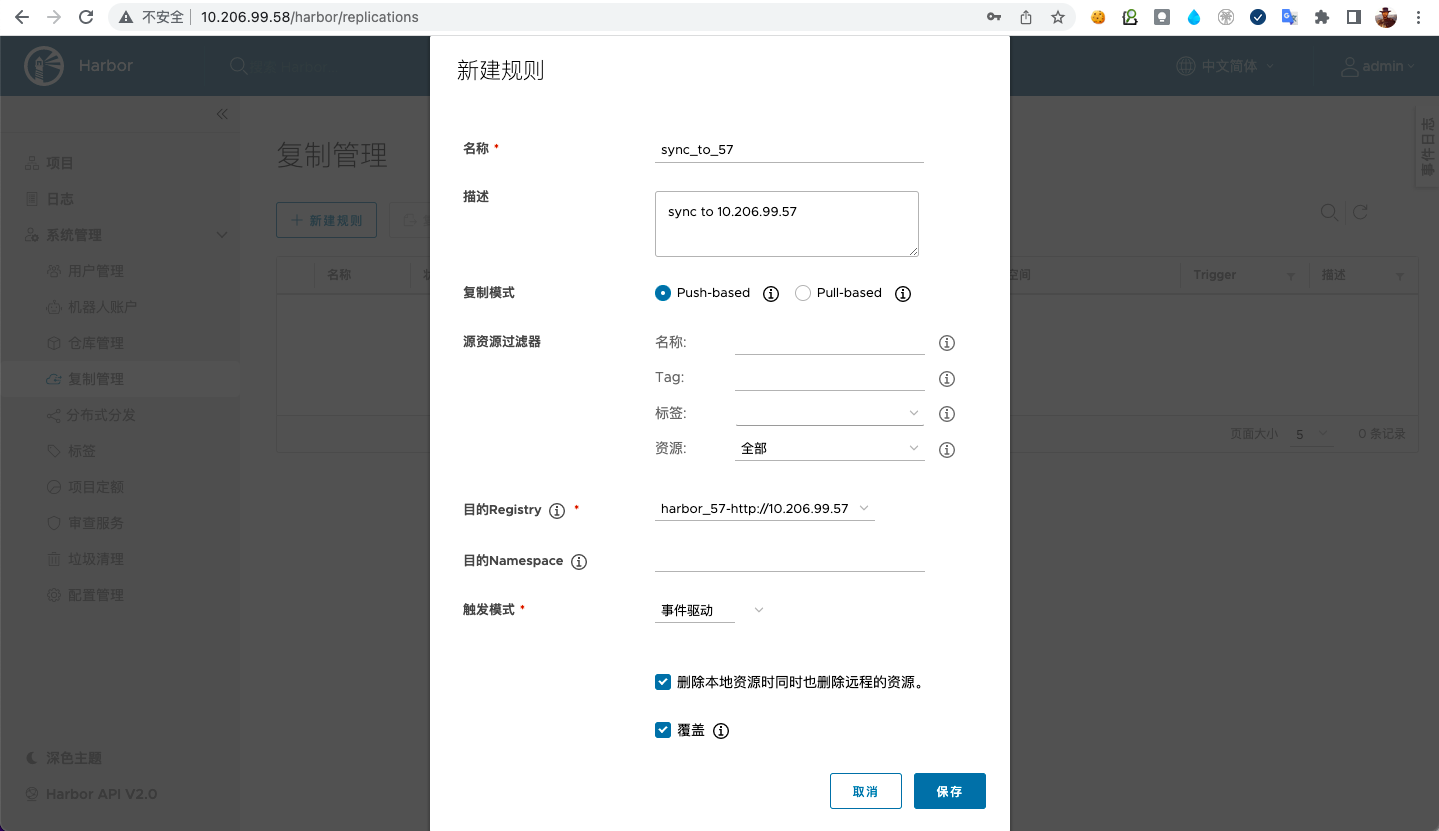
这样,当用户往 10.206.99.58 中推送/删除镜像时,10.206.99.57 也会同步发生变化。
增加反向代理
#
现在两个 harbor 实例都已经配置好了。用户看到的是两个完全独立的 harbor,他们的用户独立,访问地址不同。当然有些场景下这样已经可以满足需求了,比如异地办公的团队(可以按照地域区分使用访问地址)。如果我们想统一访问地址,可以在前面增加一个反向代理。而且可以将 ssl 证书部署在代理上。还是比较推荐的。所以我希望这个代理能实现:
- 统一的访问入口: 将两个 harbor 地址统一为一个。
- 卸载 ssl 证书: 这将简化 harbor 实例的配置,更易于证书的管理。
- 会话保持: 因为 harbor 之间复制是有时间差的,用户往一个实例中推送镜像之后不可能立即在另一实例中拉取到,所以要将客户端的请求固定到一个实例上。
但是很遗憾,harbor 实例之间用户和相关权限是无法同步的。这可能需要需要一些外在的机制实现了。
我假设提供给用户的域名是:registry.example.com,我使用 nginx 作为这个反向代理,它的配置文件/etc/nginx/conf.d/registry.example.com.conf是这样的。
 1
 2
 3
 4
 5
 6
 7
 8
 9
10
11
12
13
14
15
16
17
18
19
20
21
22
23
24
25
26
27
28
29
30
31
32
33
34
35
36
37
38
39
40
41
42
43
44
45
46
47
48
49
50
| upstream harbor{
ip_hash;
server 10.206.99.57;
server 10.206.99.58;
}
server {
listen 80;
server_name registry.example.com;
rewrite ^(.*)$ https://$host$1;
}
server {
listen 443 ssl;
server_name registry.example.com;
charset utf-8;
client_max_body_size 0;
client_header_timeout 180;
client_body_timeout 180;
send_timeout 180;
ssl_certificate /etc/nginx/conf.d/cert/registry_example_com.pem;
ssl_certificate_key /etc/nginx/conf.d/cert/registry_example_com.key;
ssl_session_timeout 5m;
ssl_ciphers ECDHE-RSA-AES128-GCM-SHA256:ECDHE:ECDH:AES:HIGH:!NULL:!aNULL:!MD5:!ADH:!RC4:!DH:!DHE;
ssl_protocols TLSv1 TLSv1.1 TLSv1.2 TLSv1.3;
ssl_prefer_server_ciphers on;
proxy_http_version 1.1;
proxy_connect_timeout 900;
proxy_send_timeout 900;
proxy_read_timeout 900;
proxy_buffering off;
proxy_request_buffering off;
proxy_set_header X-Real-IP $remote_addr;
proxy_set_header X-Forwarded-For $proxy_add_x_forwarded_for;
# 如果harbor实例仅配置了ip类型的hostname这里就不用配置了
# 如果配置了可解析的hostname/external_url需要打开注释
# proxy_set_header Host $host;
# 如果external_url中使用https但是代理访问harbor使用http需要打开注释
# 同时去掉harbor实例内部的nginx相关的$scheme配置
# proxy_set_header X-Forwarded-Proto $scheme;
location / {
proxy_pass http://harbor;
}
}
|
运行 nginx 反向代理:
1
2
3
4
5
6
| # 将证书和配置文件都放在 /etc/nginx/conf.d 路径下
docker run -d --restart=always \
--name=nginx \
-p 80:80 -p 443:443 \
-v /etc/nginx/conf.d:/etc/nginx/conf.d \
nginx
|
测试对 registry.example.com 进行login/push/pull镜像均正常,检查两个 harbor 实例也同步正常。至此,完成~
总结
#
至此,所有的安装/配置就结束了,通过体验测试我发现:
- 用户是独立的
两个实例之间的项目、镜像、标签相关资源是可以同步的,但是用户不可以。如果用户要在两个实例直接切换使用的话,需要分别登录两个 harbor admin ui 为用户创建两个相同的账号。所以说该方案比较适合异地办公团队,仅做镜像数据的同步。 - 镜像同步有一定的时间差
我的两个实例是所在虚拟机在一个网段内的,测试了一个约 900M 的镜像,从开始同步到结束大概是10秒种。如果用户在一台实例上推送之后,立马去另一台实例上拉去是不行的。所以如果两个实例前面要增加 http 代理的话,需要使用 ip_hash 负载均衡策略,将用户请求固定到其中一台实例上。 - 实例 url 地址不一致
这个问题不严重,因为是两个实例,如果我们在他们前面再部署 http 代理的话,就是三个地址。所以,两个实例对应 admin ui 上的 url 地址和用户使用的(如果有代理)url 地址都不一样。 比如:
